描述 当我收到包,打开压缩的包装和盖皮带,肩带和腰带被轻松折叠整齐,包约20高x 14宽(51厘米×35厘米)。该包装袋本身的深度依赖于侧压缩带调整,牢记包提出了一个“D”形状时,从上面看。我打开包装,松开所有的肩带和扣,并四处走动。该包的描述如下。
用于包装所有的材料都是黑色的,除非另有说明。所有带(带)中使用的包是1英寸(25毫米)宽,除非另有说明。前,后,左,右都表明尽管包着,即是在前面肩带。
内部,顶部底部:附盖下是一种白色面板约8宽x 2½高(20厘米×7厘米)与应急救援指令印刷在英语和德语(见照片)。面板是塑料涂层防水。下面的紧急指示是一个小的单向拉链允许访问的盖子本身里面,作为一个口袋里,对外面的盖子从一个单独的。下方的盖子是包的衣领。在领子的前面是drawcord和cordlock开口用于关闭上方的包装。在主室的前侧缝尼龙袋有弹性顶边,占地约的车厢底部的一半,大概是由于水化系统。
 从左侧开始,和移动上下:有两个横向压缩带。下带穿过附近的一个灰色的网状口袋,在侧面板的全宽度的顶部,约8(20厘米)高。口袋的三角形的底似乎是由相同的织物作为包本身,和顶部有一个带弹性。 右,顶部底部:右边是左边的镜像,除了在面板的顶部前水化体系的出口(见图右)。我有插笔来说明软管出口点。 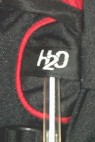  在后面,顶部底部:盖的两侧,以及一条下的背面面板各边跨下口袋顶部是红色的,称为“网站上的火和吊牌。附近的盖与包体是一种单向拉链允许访问的盖子本身内部,使用作为一个口袋。在顶部的包盖,有四个长方形的塑料环(有时称为looplocs),约1(25毫米)宽,大概是捆扎物品到上方的包装。盖子的底部两侧边缘有弹性的人。上盖的背面与多特徽标和名称,刺绣,随着“aircomfort和包的名称。 继续沿着背盖是由两个边释放扣封闭,每个都有多特的标志。皮带上扣包体缝合在创建三个菊花形拉链的每个带他们继续沿着该包的脸。通过一个在左皮带环通过另一个带,其中包括一个钩环部分创造大约3的可调环(7厘米)的时候,平。由于登山杖回路直接掉在这个循环,它带徒步、登山杆包。 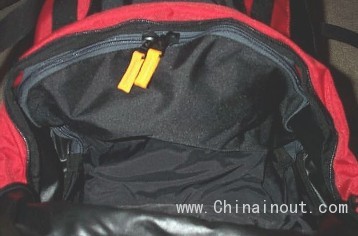 红带,约¾下来的包,弹性包面内部,看到的包下部双向拉链盖,这拉链有黑色缎带的红色缝线通过拉链标签。打开拉链,还有另一种双向拉链内连接车厢的隔板后面和侧面(缝在前面)分开的两个主要舱室。这拉链有黄丝带通过拉链标签。 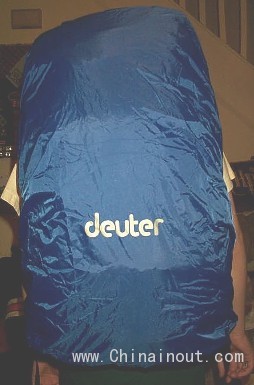  在这下面的部分,在外面,是一个小的织物标签的话“雨盖在上面绣上。下面是三室织带环:两个登山杖环在左,每3 / 8(10毫米)宽,约2(5厘米)长,和一个冰斧环约5(12厘米)长在右边。包的底部与前面的包是一个皮瓣覆盖一个单向拉链。这拉链有蓝带通过拉链选项卡。打开拉链访问一个小口袋里含有蓝色尼龙雨罩,这是附着在口袋里的一个小皮带扣(见照片)。该raincover,具有所有边缘和多特的背面印上的弹性,是大到足以覆盖包和口袋里的东西,虽然它不绑上的吻合 在这下面的部分,在外面,是一个小的织物标签的话“雨盖在上面绣上。下面是三室织带环:两个登山杖环在左,每3 / 8(10毫米)宽,约2(5厘米)长,和一个冰斧环约5(12厘米)长在右边。包的底部与前面的包是一个皮瓣覆盖一个单向拉链。这拉链有蓝带通过拉链选项卡。打开拉链访问一个小口袋里含有蓝色尼龙雨罩,这是附着在口袋里的一个小皮带扣(见照片)。该raincover,具有所有边缘和多特的背面印上的弹性,是大到足以覆盖包和口袋里的东西,虽然它不绑上的吻合包。 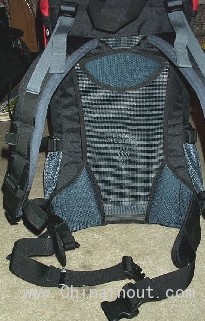 在前面,顶部底部:大环(携带足够大了我手中的肉)护垫织带是位于顶部。在进行环路两侧带连接的稳定剂,在肩带连接点。肩带,随着之间的带垫,内衬坯布要求meshtex多特。这是一个软,透气的织物,对我来说就像一个漂亮的拉绒棉。下面的带附着点是多特aircomfort悬挂系统。该系统的最明显的部分是灰色的塑料网状面板,保持绷紧,远离包装袋采用弹簧钢是附在包装袋。看到这个系统图纸和其他细节的多特网站。  继续沿着肩带,从稳定带附件的带软垫的底部,缝长带子。这带子固定(缝横向)在四个地方,沿肩带有三个环。附着在中间环的外边缘(右带只)是一个小的弹性环通,通过水化管。附底环是一个滑块连接胸骨带的肩带和允许垂直调整的环路长度。胸骨表带有一段弹性缝它创建一个膨胀节约2½在(5-6厘米)长。臀部的带软垫部分内衬meshtex织物是足够长的时间来我的臀部。皮带本身,在1½(4厘米)宽,是缝制在垫向前端和关闭与边释放扣。剩下的部分(母扣)是使用一个Triglide调整,而右部(公扣)调整使用的扣梯子锁部分,有 一个 整齐的小塑料卡调整松紧带。 继续沿着肩带,从稳定带附件的带软垫的底部,缝长带子。这带子固定(缝横向)在四个地方,沿肩带有三个环。附着在中间环的外边缘(右带只)是一个小的弹性环通,通过水化管。附底环是一个滑块连接胸骨带的肩带和允许垂直调整的环路长度。胸骨表带有一段弹性缝它创建一个膨胀节约2½在(5-6厘米)长。臀部的带软垫部分内衬meshtex织物是足够长的时间来我的臀部。皮带本身,在1½(4厘米)宽,是缝制在垫向前端和关闭与边释放扣。剩下的部分(母扣)是使用一个Triglide调整,而右部(公扣)调整使用的扣梯子锁部分,有 一个 整齐的小塑料卡调整松紧带。第一印象 我注意到,没有线头,所有接缝出现平直,所有的拉链和搭扣的顺利进行。总之,它看起来像一个好的包。包似乎比一般的便宜的背包窄一点(学校书包),但高。我松开了,所有的带子,然后试了试。我的第一步是把腰带适当调整。我发现调整可用的(我的腰围的人)会离开扣点左侧的中心。这只是一个小问题,表明我(有点)附近的带尺寸的外部界限。它,然而,意味着我不可能不小心松开扣在我的旅行短裤在发布包。然后我收紧肩带连接胸骨表带。我有一个很长的ISH的躯干,胸骨带穿过我的胸部略低于我的锁骨。我能够调整与使用滑块附着在胸骨带的位置,但不显着较低的比它已经是。再次,这不一定是个问题,因为它不接触我的脖子或喉咙。 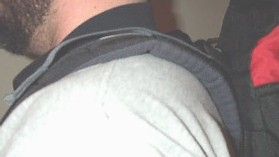 最后,与袋塞上一个睡袋形状和重量,我整理了稳定带。我从未有过负荷的带子上的包之前,所以我不知道什么期望。带子,它是灰色的,附加到肩带在后面的我的肩膀顶中心点在大约10-15度角向下转到包。这些职位将在一个不同的人有不同的躯干长度。肩带似乎稳定负载点,但我不知道如何在第一个显着,但我已经刷爆的包装,在约35磅(16公斤)一次或两次。我发现包是明显的体重(惊喜!),但稳定。该aircomfort悬浮并负载转移到臀部带了很好的工作。我不指望有几乎经常这么多的重量,但总是有这种可能性–尤其在多天的徒步旅行的第一天。 最后,与袋塞上一个睡袋形状和重量,我整理了稳定带。我从未有过负荷的带子上的包之前,所以我不知道什么期望。带子,它是灰色的,附加到肩带在后面的我的肩膀顶中心点在大约10-15度角向下转到包。这些职位将在一个不同的人有不同的躯干长度。肩带似乎稳定负载点,但我不知道如何在第一个显着,但我已经刷爆的包装,在约35磅(16公斤)一次或两次。我发现包是明显的体重(惊喜!),但稳定。该aircomfort悬浮并负载转移到臀部带了很好的工作。我不指望有几乎经常这么多的重量,但总是有这种可能性–尤其在多天的徒步旅行的第一天。我用包有很高的在我的肩前或在顶部他们的大部分功能带。这是一些与此包的情况,但带比其他包我用了更长的时间,留下一些循环使用。我已经把我的手机(应急)到一个带,使用菊花链的环,和一个14通道的对讲机拇指环(至少一天徒步)。我也很高兴的发现仍有带子的接触我的肋骨部分填充。我插入了一升(回收的苏打瓶到每个)侧面的口袋里找到的是一个不错的选择,一些多余的地方。较低的压缩带结合口袋的上衣,为内容提供额外的安全。我发现瓶子难以到达的包,但在易滑和与包了。我都用了2升(早期)和三(最近)水囊与此包,所以我主要使用口袋的燃料瓶和卫生用品(抹子,消毒剂,等)保持任何污染从我的食物和衣服。几乎每一次我拿起包的前6个月我发现了一些我以前没有见过的。吨的乐趣,只是为了看看想想多特可能藏在那里找到我。有带/带刚上的拉链区分其使用三种不同的颜色,大声哭出来。只有一件事我真的错过了第一次有更多的外部口袋,湿的东西等,虽然我的负荷,减少了在过去的4年里,这已经成为我的––非问题。 测试 我发现,即使我有最重的负荷进行比较好的平衡。我做的,然而,确定有一个舒适的极限的未来。与最大负载–我估计大约35磅(16公斤)–我意识到了底悬浮的附件,在保持与弯曲钢筋约1高x 8宽(2.5厘米×20厘米)。酒吧的结束了自己的存在,在我的臀大肌前称,这–诚然–比大多数有点大。我经历了从接触无痛苦,和最小的不适–感谢Futura的填充–但我相信有这么大的压力会使我比我愿意忍受更长的旅行更加不舒服。考虑到重,在这种情况下,大多数是集团食品的一种类型,我不会说任何延长的时间,我不希望碰到一个3-season设置这个问题。雨盖不超过最大负荷,由于项目捆绑在外面但如果只有小,适合项目连接。这适合,或缺乏,成为一个问题在早期的时候我有一个短的机会(1小时左右)在一场透雨–比圣经比例不加息,但意义非凡。我总算找到了一个塑料袋足够大以保护我的Therm-a-Rest和睡袋(其一袋东西,这应该是防水的,但无论如何)决定,一切都是完好无损的水,这将是一个完美的测试包的耐水性。在这小小的旅行后,我解开Futura发现以下与水相关的问题:
 在右边,你可以看到负载放在(大床)床前,加息的夜晚。我儿子的物品是左边的照片可见。向下移动床的中心是社区齿轮:厨师集与水和燃料瓶;匹配;手消毒剂;塑料刀;罗盘;尼龙绳袋拉链袋;股权;卫生装备;急救,防晒霜和棉签(我的儿子把这最后的三)。我的齿轮,从上到下,从左到右:风裤子上;羊毛;绗缝衬;四软饮料瓶;羊毛手套;针织帽雨衣;观看;瑞士军刀;2-AA maglite;有限eyz带maglite;2双袜子;风夹克;3包方便面和饼干的营养;6谷物棒;6个馅饼;玻璃陨石迷航锂;笔;手机;TARP TARP夹。我穿着内裤袜子:;;尼龙短裤;通风帽;排汗T恤;14.99美元的靴子与21美元的足弓支撑鞋垫。对浆纱的几点注意事项:我有一个相当长的躯干,在20½- 21(52-53厘米)。以髋带妥善放置和调整,该稳定带滴从我的肩膀上的包约15°- 30°角。这张照片可以发现以上。带这些一般,在我的经验中,试图去从肩膀到包在超过45°角,通常称为负载的带子。我发现带能稳定负载,即使在他们与包角。同时,有较长的躯干,肩带的填充部分的来临并不远了我的胸口,它可能在一个较短的人,和胸骨带需要在其最低的位置是最有效的。我发现这些问题没有问题,并且很高兴知道带子的下部有足够的足够长的时间,还提供了一个非常舒适的适应,以及一个稳定的旅程 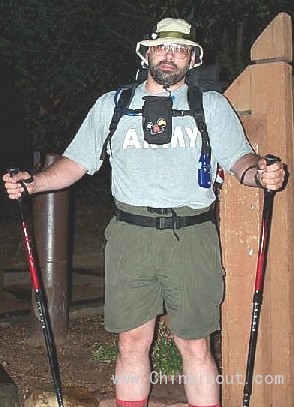 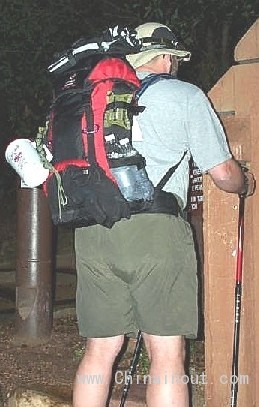 在左边,你可以看到在其正常位置的胸骨带(我),直到它将调整。带子的填充部分端只在“军”。我从来没有发现这是一个问题。在右边,满载包。请注意,顶部的盖子来约我脖子的基地,和油布仅略高于。同时注意肩带连接到包在我的肩膀上一个好的距离。我没有发现这是一个问题。上面的列表显示约5.9夸脱的水容量(5.6升),这相当于大约12.3磅(5.6公斤)。即使有多的水(加上一个额外的2瓶水从我儿子的第一个几英里后),在顶部的一切包装的主要部分主要进行,我不会感到任何不适从包。事实上,我甚至很少想到包,除了在检索项。我用富利为我和菲尔蒙特球探农场航班随身行李里,海拔6500-12441”(1981米至3792米),并高兴地发现,以及它如何适应行李架。包装作为我的日常的书(和水)载体在菲尔蒙特,以及一些旅行以来,我估计有超过200英里(320公里)现在。我只是抓住多特任何旅行我会成为第二天性。 在未来 我会继续使用多特,只要我的总负载小于大约30磅(13.6-15.9公斤)。当我发现自己与一个体积较大的包一个潜在的需要,我选择购买一个较大的富利模型(与aircomfort悬挂),放弃我的尝试和真正的爱丽丝包。事实上,我和我的儿子会带着多特包出游。 在左边,你可以看到在其正常位置的胸骨带(我),直到它将调整。带子的填充部分端只在“军”。我从来没有发现这是一个问题。在右边,满载包。请注意,顶部的盖子来约我脖子的基地,和油布仅略高于。同时注意肩带连接到包在我的肩膀上一个好的距离。我没有发现这是一个问题。上面的列表显示约5.9夸脱的水容量(5.6升),这相当于大约12.3磅(5.6公斤)。即使有多的水(加上一个额外的2瓶水从我儿子的第一个几英里后),在顶部的一切包装的主要部分主要进行,我不会感到任何不适从包。事实上,我甚至很少想到包,除了在检索项。我用富利为我和菲尔蒙特球探农场航班随身行李里,海拔6500-12441”(1981米至3792米),并高兴地发现,以及它如何适应行李架。包装作为我的日常的书(和水)载体在菲尔蒙特,以及一些旅行以来,我估计有超过200英里(320公里)现在。我只是抓住多特任何旅行我会成为第二天性。 在未来 我会继续使用多特,只要我的总负载小于大约30磅(13.6-15.9公斤)。当我发现自己与一个体积较大的包一个潜在的需要,我选择购买一个较大的富利模型(与aircomfort悬挂),放弃我的尝试和真正的爱丽丝包。事实上,我和我的儿子会带着多特包出游。things我喜欢
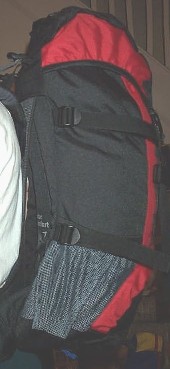
在这4年来,我有这个包,多特取得了一些小的变化–侧波纹管的口袋,前面的拉链口袋,一个小的腰带口袋,和更新的配色方案。这些变化增加了几盎司,但这不应该使一个显着的差异除非暂停已彻底改变,我不相信它。我爱我的未来32–和它的大哥哥,富利50 + 10–足够多,我的爱丽丝包是我在部队的那些日子 一个纪念品,我可以给那些需要一个旅行包的人。未来的日子,我希望能继续使用这个包。 谢谢你的时间。 Chuck Kime a.k.a. Fuzzy description When I received the pack the compression and lid straps were cinched all the way down, while the shoulder straps and hip belt were relaxed and folded neatly into the suspension system. In this state, the pack is approximately 20 in high x 14 in wide (51 cm x 35 cm). Depth of the pack bag itself is dependent on the adjustment of the side compression straps, keeping in mind that the bag presents a ‘D’ shape when viewed from above. I opened the pack up, loosened all straps and buckles, and did a walk-around. The description of the pack is below. |
| All materials used in the pack are black, unless otherwise noted. All straps (webbing) used in the pack are 1 in (25 mm) wide, unless otherwise noted. Front, back, left, and right are all indicated as though the pack is worn, i.e. the shoulder straps are on the front. |
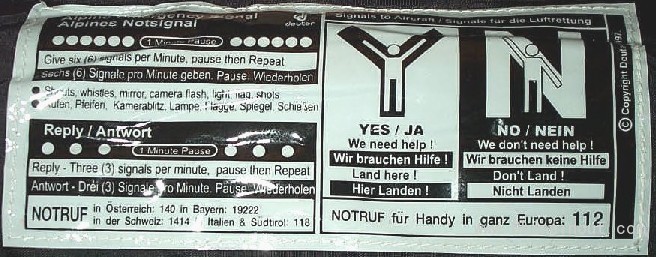
| Inside, top to bottom: Attached under the lid is a white panel approximately 8 in wide x 2½ in high (20 cm x 7 cm) with emergency rescue instructions printed in English and German (see photo below). The panel appears to be plastic coated for waterproofing. Below the emergency instructions is a small 1-way zipper that permits access to the inside of the lid itself, for use as a pocket, separate from one on the outside of the lid. Just below the lid is the collar of the pack. At the front of the collar is an opening for the drawcord and cordlock used to close the top of the pack. On the front side of the main compartment is sewn a nylon pocket with an elastic top edge, covering roughly the bottom half of the compartment, presumably for the hydration system. |
| Starting on the left, and moving top to bottom: There are two horizontal compression straps. The lower strap crosses near the top of a grey mesh pocket that is the full width of the side panel, and approximately 8 in (20 cm) high. The gusseted bottom of the pocket appears to be made from the same fabric as the pack itself, and the top has a strip of elastic. Right side, top to bottom: The right side is a mirror image of the left, except for the exit port for the hydration system at the top front of the panel (see photo at right). I have inserted a pen to illustrate the hose exit point. |
| On to the back, top to bottom: The sides of the lid, as well as a strip down each edge of the back panel and across the top of the lower pocket are red, called ‘Fire’ on the web site and hang tag. Near wher the lid meets the pack body is a 1-way zipper that permits access to the inside of the lid itself, for use as a pocket. On top of the pack lid, there are four rectangular plastic loops (sometimes called looplocs), approximately 1 in (25 mm) wide, presumably for strapping items onto the top of the pack. The bottom edges of both sides of the lid have elastic in them. On the back face of the lid is embroidery with the Deuter logo and name, along with ‘aircomfort’ and the name of the pack. Continuing down the back: The lid is held closed by two side-release buckles, each with the Deuter logo. The straps that attach the buckles to the pack body are stitched across to create three daisy chain loops on each strap as they continue down the face of the pack. Through one of the loops on the left strap is passed another strap, which incorporates a hook-and-loop section to create an adjustable loop approximately 3 in (7 cm) when flat. Since the hiking pole loops fall directly below this loop, it works to strap hiking/trekking poles to the pack. |
| The red strip, about ¾ down the back of the pack and incorporating elastic inside the fabric, covers a 2-way zipper for accessing the lower compartment of the main bag. This zipper has black ribbon with red stitching through the zipper tabs. Upon opening this zipper, there is another 2-way zipper inside that connects the back and sides of the compartment separator (sewn at the front) that separates the two main compartments. This zipper has yellow ribbon through the zipper tabs. Opening this zipper makes the bag one large compartment from top to bottom. |
| At the base of this lower compartment, on the outside, is a small fabric tag with the words ‘RAIN COVER’ embroidered on it. Below the compartment are three webbing loops: two hiking pole loops on the left, each 3/8 in (10 mm) wide and approximately 2 in (5 cm) long, and one ice axe loop approximately 5 in (12 cm) long on the right. wher the bottom of the pack meets the front of the pack is a flap covering a 1-way zipper. This zipper has blue ribbon through the zipper tab. Opening this zipper accesses a small pocket containing a blue nylon rain cover, which is attached inside the pocket with a small strap and buckle (see photo below). The raincover, which has elastic all around the edge and ‘deuter’ printed on the back, is large enough to cover the pack and its pockets, though it does not fit well with something lashed on top of the pack. |
| On the front, top to bottom: A large carry loop (plenty large enough for my meaty hands) of unpadded webbing is located at the top. On either side of the carry loop are the stabilizer strap connections, and below that the shoulder strap attachment points. The shoulder straps, along with the pads between the straps, are lined with a grey fabric Deuter calls MeshTex. This is a soft, ventilated fabric that feels to me like a nice brushed cotton. Below the strap attachment point is the Deuter Aircomfort suspension system. The most visible component of the system is the grey plastic-like mesh panel that is kept taut and away from the pack bag by spring steel stays attached to the pack bag. See the Deuter web site for drawings and other details of this system. |
| Continuing down the shoulder strap, from the stabilizer strap attachment to the bottom of the padded section of the strap, is sewn a length of webbing. This webbing is anchored (sewn laterally) in four places, creating three loops along the length of the shoulder strap. Attached to the outer edge of the middle loop (right strap only) is a small elastic loop through which to pass hydration tubes. Attached to the bottom loop is a slider connecting the sternum strap to the shoulder strap and allowing vertical adjustment over the length of the loop. The sternum strap has a section of elastic sewn to it to create an expansion section approximately 2-2½ in (5-6 cm) long. |
| The padded portions of the hip belt are lined with MeshTex fabric and are long enough to just go over my hip bones. The belt itself, 1½ in (4 cm) wide, is sewn to the pads toward the forward ends and closes with a side release buckle. The left portion (female buckle) is adjusted using a triglide, while the right portion (male buckle) adjusts using the ladder-lock portion of the buckle, with the loose end of the strap held neatly by a small plastic clip. |
| First Impressions I noticed no loose threads, all seams appeared straight and even, all zippers and buckles worked smoothly. All in all, it looks like a well-made pack. The pack appears a little narrower than the average cheap daypack (school book bag), but taller. I loosened up all of the straps, and tried it on. |
| My first step was to get the hip belt properly adjusted. I found the adjustment available (for someone of my girth) would always leave the buckle somewhat left of center. This is just a minor issue, indicating that I am (somewhat) near the outer limits for the belt size. It does, however, mean that I am less likely to accidentally unclip the buckle on my hiking shorts when releasing the pack. |
| I then tightened the shoulder straps and connected the sternum strap. As I have a long-ish torso, the sternum strap crossed my chest just slightly below my collarbone. I was able to adjust the location of the sternum strap using the sliders with which they are attached, but not significantly lower than it already was. Again, this is not necessarily a problem, as it did not contact my neck or throat. |
| Finally, with the bag stuffed with a sleeping bag for shape and some weight, I snugged up the stabilizer straps. I had never had load lifter straps on a pack before, so I wasn’t sure what to expect. The straps, which are grey, attach to the shoulder straps at a point behind the top center of my shoulders and go downward to the pack at about a 10-15 degree angle. These positions would differ on a person with a different torso length. The straps did seem to stabilize the load somewhat, but I couldn’t tell how significantly at first, but I have maxed the pack out at about 35 lb (16 kg) once or twice. I found the bag to be noticeably heavier (surprise!), but stable. The Aircomfort suspension did a pretty good job of transferring the load to the hip belt. I don’t expect to have nearly that much weight in it too often, but there is always that possibility – especially on the first day of a multi-day hike. |
| I am used to pack straps having the majority of their features either very high in front of my shoulders or on top of them. This was somewhat the case with this pack, but the straps are longer than other packs I have used, leaving some loops available for use. I have attaching my cell phone (for emergencies only) to one of the straps, making use of the daisy chain loops, and a 14-channel walkie-talkie to the thumb loops (at least for day hikes). I was also pleased to find that there was still padding on the portions of the straps that contacted my ribs. |
| I inserted a 1-liter (recycled soda) bottle into each side pocket and found them to be a good fit, with some room to spare. The lower compression straps align with the tops of the pockets, providing additional security for the contents. I found the bottles difficult to reach with the pack on, but easy to slip in and out with the pack off. I have used both 2-liter (early days) and 3-liter (more recently) hydration bladders with this pack, so I primarily use the pockets for fuel bottles and hygiene items (trowel, sanitizer, etc.) to keep any contamination from my food and clothes. |
| Almost every time I picked up this pack for the first 6 months I found something I hadn’t seen before. Tons of fun just to look at and think what Deuter may have hidden in there for me to find. There are three different colors of ribbon/webbing just on the zipper pulls to distinguish their uses, for crying out loud. The only thing I really missed at first was having more outside pockets, for wet things, etc., though as my load has reduced over the past 4 years, this has become – for me – a non-issue. |
| Testing I found even the heaviest load I have carried to be relatively well balanced. I did, however, determine that there is a comfort limit to the Futura. With the maximum load – I estimate around 35 lb (16 kg) – I became aware of the bottom suspension attachment, wher the stays are joined to a curved steel bar approximately 1 in high x 8 in wide (2.5 cm x 20 cm). The ends of the bar made their presence known at the top of my gluteus maximus, which – admittedly – are a tad more maximus than most. I experienced no pain from this contact, and minimal discomfort – thanks to the Futura’s padding – but I believe a longer hike with that much pressure would have left me more uncomfortable than I would be willing to put up with. Considering that the majority of the weight carried in this situation was group food of a type I am not likely to hike with for any extended period of time, I don’t expect to come up against this problem in a 3-season setting. |
The rain cover would not fit over the largest load, due to items lashed on the outside, but would fit if only small items were attached. This fit, or lack thereof, became an issue early on when I had the opportunity for a short (1 hour or so) hike in a soaking rain – somewhat less than biblical proportions, but significant nonetheless. I managed to locate a plastic bag large enough to protect my Therm-a-Rest and sleeping bag (in its stuff sack, which should be waterproof anyway), but decided that everything else would be undamaged by water and this would be a perfect test of the pack’s waterproofness. Upon completion of this little jaunt, I unpacked the Futura and found the following water related issues:
|
| I tend to generate a lot of heat when moving, due both to large muscle mass and plenty of – ahem – ‘natural insulation’, so I am especially impressed by the capability of the Deuter Aircomfort system to keep my back cool and dry, especially as it compares to the day pack I was using previously. |
| The “Deuter-Super-Polytex” fabric used in the Futura 32 is listed as a PU coated 600-denier polyester weave, which is supposed to be rip and abrasion proof. While I have not abused the pack to fully test these claims – nor will I – I did not baby it, either. After 4 years now, there has been no noticeable wear – only some dirt which has more or less brushed off. |
| The defining characteristic of the Future, to me, is the Aircomfort suspension. This suspension system uses a panel of plastic mesh that is kept taut by the internal spring steel stays and rides against the wearer’s back, keeping the pack away from the body and permitting airflow and evaporative cooling. It has been my experience that the Aircomfort system works as advertised. |
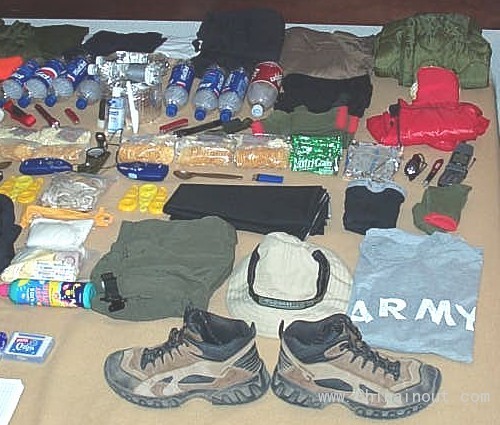
The Futura was with me in late July, 2003, on my first “long-distance” hike in some time: an attempt to hike the 13-mile (20.8 km) Barr Trail up Pikes Peak – elevation 14,110’ (4,301 m) – and back in one day. While my son and I didn’t manage to hike to the summit, we did have a nice lunch at 10,200’ (3,109 m) before the hike back down. Side note: if you are unaccustomed to altitude, believe the guides when they say to plan for two days on Pikes Peak – we only managed 1 mph (1.6 kph) on the way up. Here is my gear list from that hike (photo below):
|
| Note on the military issue items listed above: Like the Gore-Tex, it’s not the lightest stuff around, but I’ve already got it. |
| While this list may seem like overkill on a few items, we tried to be prepared for staying on the mountain overnight if necessary, and carried no water treatment on this trip. I found this load, as large as it was, to be comfortable and well-balanced, even with a few of the items packed on the outside: I carried my rain suit and the trowel in one side pocket; my fuel and water-measuring bottles in the other; my compass clipped on an upper compression strap; my gloves and insulated mug clipped on the daisy chains; and the tarp, stakes and lines strapped on top. Everything else, including all community gear except the first aid and sunscreen (which my son carried), fit neatly, if snugly, inside the pack. |
| At right, you can see the load laid out on the (king-size) bed, the night before the hike. My son's items are visible on the left of the photo. Moving down the center of the bed is the community gear: cook set with water and fuel bottles; matches; hand sanitizer; plastic knife; compass; zipper bag of nylon cords; stake bag; hygiene kit; first aid, sunscreen and Q-tips (my son carried these last three). My gear, top-to-bottom, left-to-right: wind pants; fleece top; quilted liner; four soft drink bottles; fleece gloves; knit watch cap; rain suit; Swiss Army knife; 2-AA Maglite; Nite-Eyz band for Maglite; 2 pair socks; wind jacket; 3 packs Ramen noodles and crackers; 6 Nutri-Grain bars; 6 Pop-Tarts; Tektite Trek Lithium; pen; cell phone; tarp clips; tarp. I wore: briefs; socks; nylon shorts; vented hat; wicking tee; $14.99 boots with $21.00 arch support insoles. |
| A few notes on sizing: I have a fairly long torso, at 20½-21 in (52-53 cm). With the hip belt properly placed and adjusted, the stabilizer straps dro from the tops of my shoulders to the pack at about a 15°-30° angle. A photo of this may be found above. Straps like these generally, in my experience, are intended to go up from the shoulders to the pack at upwards of a 45° angle, and are usually referred to as load-lifter straps. I found the straps able to stabilize the load well, even at the angle they made with the pack. Also, with a longer torso, the padded portion of the shoulder straps did not come as far down my chest as it might on a shorter wearer, and the sternum strap needed to be at its lowest position to be most effective. I found no problem with either of these issues, and was pleased to realize that the lower portions of the straps were sufficiently long enough to still provide a very comfortable fit, as well as a stable ride. |
| At left, you can see the sternum strap in its normal location (on me), as far down as it will adjust. The padded portions of the straps end just at the top of the word "ARMY". I never found this to be a problem. At right, the fully loaded pack. Note that the top of the lid comes up to about the base of my neck, and the tarps only slightly higher than that. Also note that the shoulder straps attach to the pack a good distance below the tops of my shoulders. I never found this to be a problem. |
| The list above indicates a water capacity of approximately 5.9 quarts (5.6 liters), which works out to around 12.3 lb (5.6 kg). Even with this much water (plus an additional 2 water bottles taken from my son after the first few miles), mostly carried in the main part of the pack on top of everything else, I never felt any discomfort from the pack. As a matter of fact, I rarely even thought about the pack, except when retrieving items from it. |
| I used the Futura as my carry-on bag for my flights to and from Philmont Scout Ranch, elevation 6,500’ - 12,441' (1,981 m - 3,792 m), and was pleased to find how well it fit into the overhead compartment. The pack was used as my daily book (and water) carrier while at Philmont, as well as a number of trips since, and I estimate it has over 200 mi (320 km) on it now. It has become second nature for me to just grab the Deuter for any traveling I may do. |
| I will continue using the Deuter in the future, as long as my total load stays below about 30-35 lb (13.6-15.9 kg). When I found myself with a potential need for a larger volume pack, I chose to purchase one of the larger Futura models (with the Aircomfort suspension), forsaking my tried-and-true ALICE pack (previously reviewed at BGT). Given the fact that I will not loan out the Futura, even to my son – hey, we go on 95% of our trips together – he has gotten a Futura 32 for himself. |
THINGS I LKE
|
| SUMMARY In the 4+ years I have had this pack, Deuter has made some minor changes – side bellows pockets, a front zippered pocket, a small hip belt pocket, and updates to the color scheme. These changes have added a few ounces, but this shouldn’t make a significant difference unless the suspension has been radically altered, which I do not believe it has. I love my Futura 32 – and its big brother, the Futura Vario 50+10 – enough that my ALICE pack is now just a souvenir from my days in the Army that I can loan out to people who need a pack for a trip. I expect to be using this pack for many years to come. |
| Thank you for your time. Chuck Kime a.k.a. Fuzzy |